Fine-tune YOLO11 (Halloween Edition)

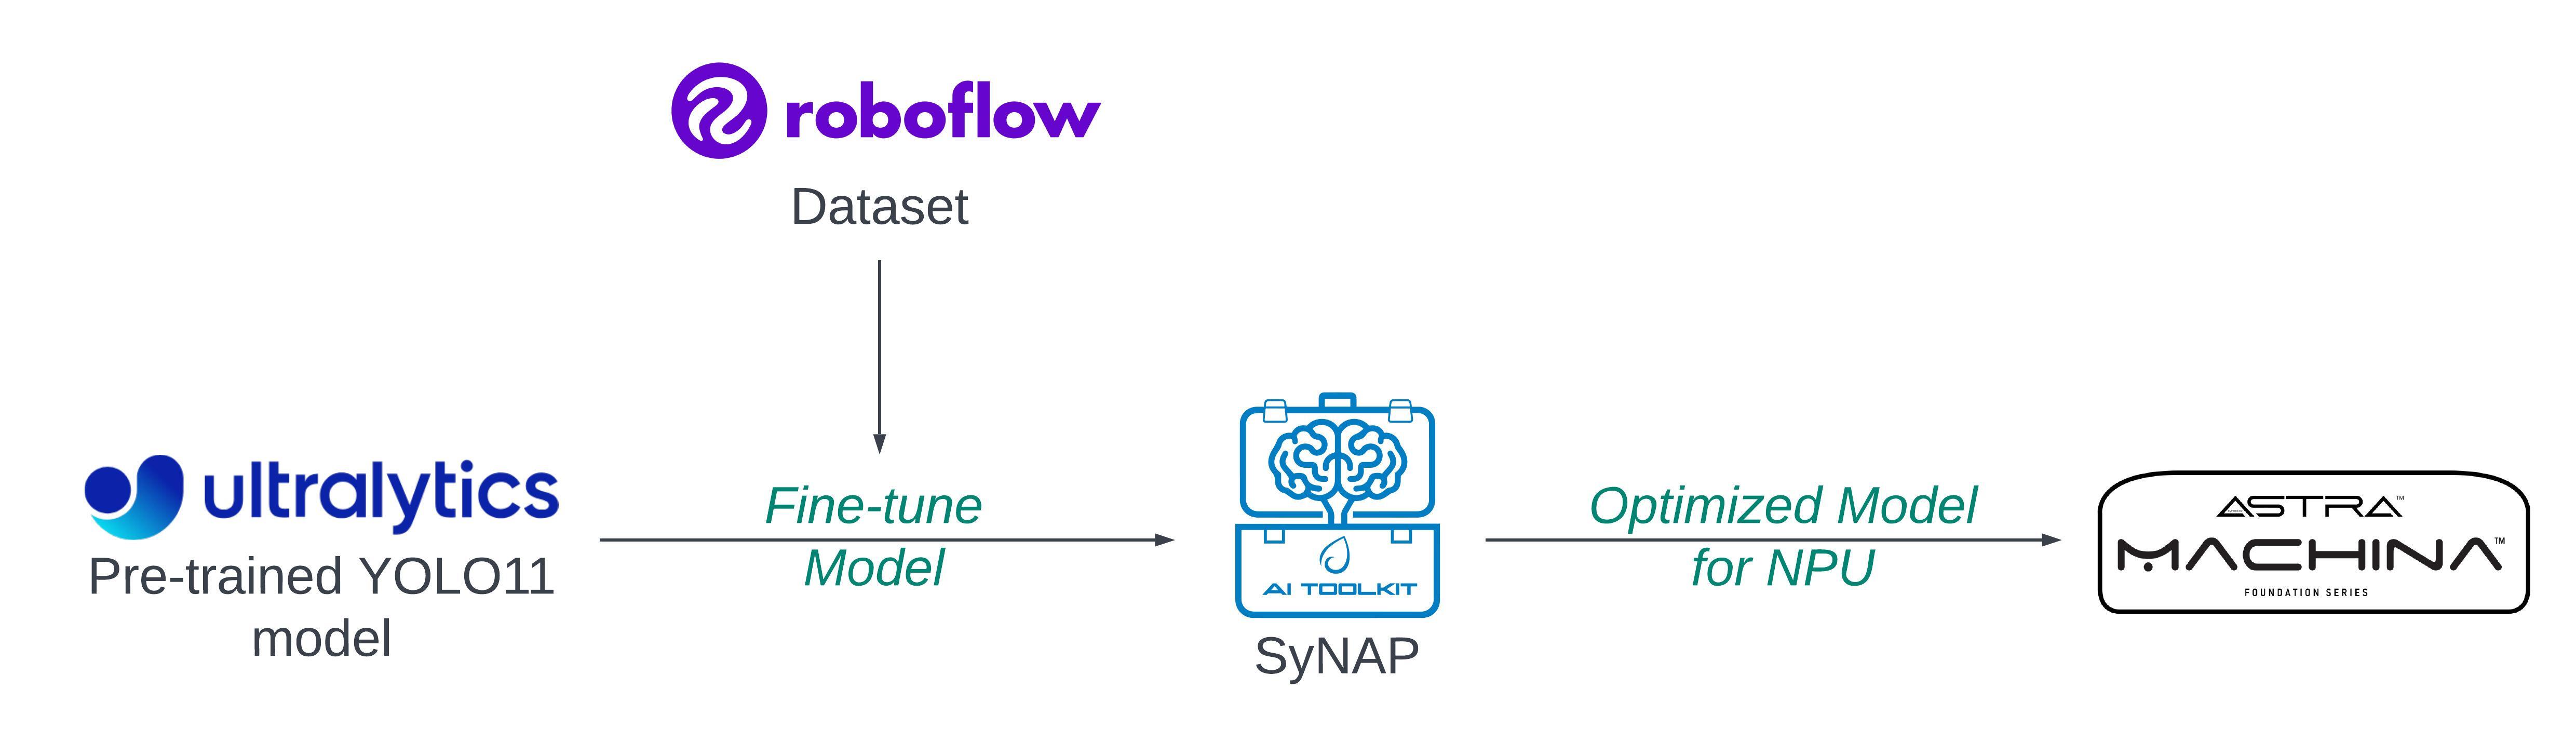
Object detection has seen remarkable progress with innovations like the YOLO series, a powerhouse in real-time detection tasks. With each new iteration, YOLO brings enhanced accuracy and speed, making it ideal for applications across security, autonomous vehicles, and more. In this blog, you will walk through fine-tuning YOLO11, the latest version of the YOLO family, on a custom pumpkin dataset using Roboflow, optimizing the model for Astra Machina's NPU, and running real-time video inference on Astra Machina.
Why Fine-Tune?
To make the model understand custom labels, like "pumpkin," fine-tuning a pre-trained model on a new custom dataset is essential. YOLO11 is pre-trained on the COCO dataset, a robust collection of images and labels that include 80 common object categories such as people, animals, and vehicles. However, COCO lacks specialized classes like pumpkins, so the model doesn't recognize these objects out-of-the-box. Fine-tuning allows you to transfer the general object detection capabilities learned from COCO to recognize specific new classes (pumpkins, in this case) while retaining its understanding of spatial features and object boundaries.
Your Dataset is the Key!
Yes, you read it correctly. When it comes to fine-tuning, ensuring your model can effectively detect new labels is crucial. A well-prepared dataset gives the model the range it needs to identify objects in diverse settings, making it resilient to variations it will encounter in real-world applications.
Platforms like Roboflow offer an extensive collection of datasets and models, with thousands tailored for object detection, classification, semantic segmentation, etc. In this case, you will work with a pumpkin dataset specifically curated for Halloween. You can download the Pumpkin dataset from Roboflow. This dataset is already formatted for several models of YOLO; you will use YOLO11. Here is a direct link to download the dataset: Pumpkin Dataset.
Ensure your directory structure looks something like this:
├── pumpkin-dataset/
│   ├── train/
│   ├── valid/
│   ├── test/
│   └── data.yaml
And make sure that the data.yaml file is correctly set up with the necessary information about your dataset, including the paths to the training, validation, and test datasets. Double-check that the file includes accurate paths to your data and specifies the names of the names and nc (number of classes) you intend to use for fine-tuning the model.
nc: 1
names: ['Pumpkin']
Understanding YOLO11 Fine-Tuning
When fine-tuning YOLO, you start with a pre-trained model that has already learned to detect general objects on COCO. Fine-tuning adapts the model's weights incrementally, enabling it to learn pumpkin-specific features. You initialize the model with pre-trained weights from COCO, skipping the training of initial layers as they contain low-level visual features (like edges and textures) which are common across different object types. The later layers adjust to pumpkin-specific features. Since YOLOv11's architecture is already optimized for object detection, you only modify the output layers to recognize your new classes.
So, load a pre-trained YOLO11 small object detection model from Ultralytics and train it on the pumpkin dataset. Here, the image resolution is chosen as 320x320; you can configure it to your requirements.
model = YOLO('yolo11s.pt')
model.train(data='/content/pumpkin-dataset/data.yaml', epochs=100, imgsz=(320,320), name='pumpkin_yolo', augment=True )
Key parameters:
data: Path to your dataset configuration file (data.yaml).epochs: The number of training epochs (adjust based on your needs).imgsz: The image size (default is 320x320).name: The name of the training run.
Evaluate and Test the Model
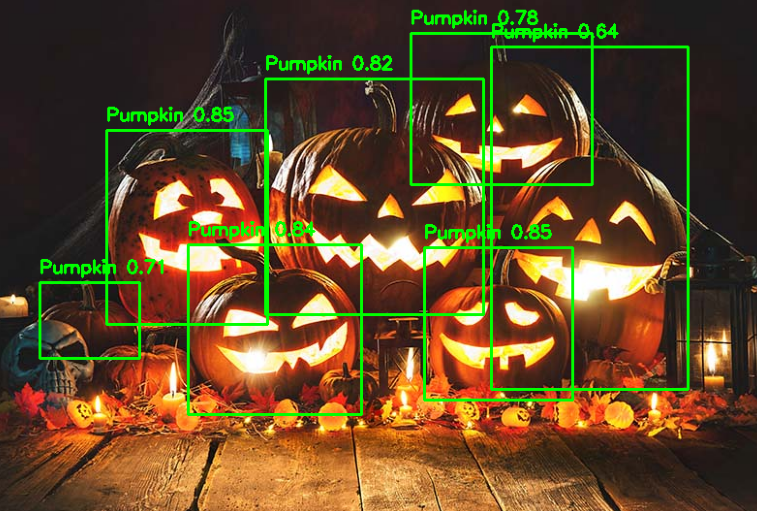
After training, evaluate performance on the test set. Key metrics include precision, recall, and mean Average Precision (mAP) for detecting pumpkins. With smaller datasets, it's common to see faster overfitting, so monitoring these metrics helps guide parameter adjustments for optimal results. Once training is completed, you can evaluate the model on the validation or test set.
Optimize Model for Astra Machina
Once your model is trained and ready, the next step is to save the model and export it in TensorFlow Lite (.tflite) format, specifically as a float32 model. Then optimize it for Astra Machina's NPU using the SyNAP toolkit. This will handle the optimization and quantization, converting your model into a .synap format that runs efficiently on the NPU.
During optimization, it's best practice to provide a dataset in the meta.yaml file that matches the resolution of your model. For example, since the model uses 320x320 images, ensure your dataset contains images of this size. Thus, get a 320x320 image or download and resize the bus.jpg.
Also, make sure the model resolution matches the values in shape and format in the meta yaml.
!synap_convert --model /content/best_float32.tflite --target SL1680 --meta /content/synap.yaml --out-dir yolo
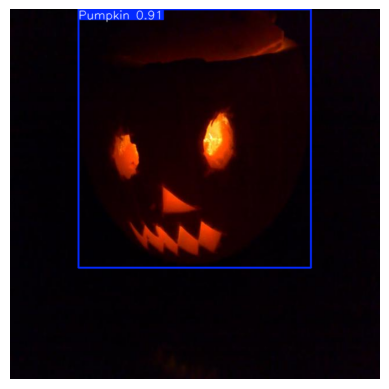
Run Inference on Astra Machina
Now that you've got your model optimized and compiled for Astra Machina's NPU, it's time to see it in action. First, transfer the .synap model you just created over to your Machina board.
Since you fine-tuned the model specifically to detect pumpkins (with just one class), you'll need to create a label.json file to let the system know what that class is. It's super simple—just map the label to the index like this:
{
    "labels": ["Pumpkin"]
}
The SyNAP Examples GitHub repository has you covered with Python demos that are all set up for real-time video inference. Whether you're using a live camera feed, a video file, or an RTSP stream, these scripts handle everything—so you can focus on watching those pumpkins get detected in real-time.
Further Reading
Fine-tuning YOLOv11 to detect pumpkins and optimizing it for Astra Machina's NPU illustrates how adaptable object detection models can be for specific use cases. For those eager to explore further, here is a step-by-step tutorial to guide you.