Roboflow YOLO11 customization
This tutorial will guide you on how you can run a custom YOLO11 model on Synaptics Astra™ Machina™. This will guide you on fine-tuning a YOLO11 small model on PPE dataset, Optimizing it for Astra and then running it on the Astra Machina Board.
In industrial and construction environments, wearing personal protective equipment (PPE) like helmets, jackets and shoes is crucial for safety. Automating PPE detection using computer vision can improve compliance and ensure a safer workspace.
You can use a pre-trained YOLO model from Ultralytics, a popular object detection model that is fast, accurate, and easy to use. The dataset we will use contains annotated images of PPE and the model will be fine-tunned to detect them.
Step 1: Fine-Tune YOLO11 Model on PPE Dataset
This tutorial is designed to be followed in Google Colab, but with minimal adjustments, the steps can also be run in a local Jupyter Notebook environment.
Install Required Libraries
You need to install the necessary dependencies, including Ultralytics and OpenCV.
!pip install ultralytics
!pip install opencv-python-headless matplotlib
Download the PPE Dataset
You can download the PPE dataset from Roboflow. This dataset is already formatted for several models of YOLO, select v4 version, YOLOv11 format one. Here is direct link to download the dataset: PPE Dataset.
from ultralytics import YOLO
import os
import zipfile
import requests
import matplotlib.pyplot as plt
import cv2

dataset_url = "https://universe.roboflow.com/ds/7nvWqmKXi7?key=Y3UrCkPmxF"
dataset_zip = "dataset.zip"

response = requests.get(dataset_url)
with open(dataset_zip, 'wb') as file:
    file.write(response.content)
with zipfile.ZipFile(dataset_zip, 'r') as zip_ref:
    zip_ref.extractall('dataset')
This will download the dataset and unzip it into a folder dataset. Ensure your directory structure looks something like this:
├── dataset/
│   ├── train/
│   ├── valid/
│   ├── test/
│   └── data.yaml
The data.yaml file should contain information about the dataset, including paths to the training, validation, and test datasets.
Check if the data.yaml file contains correct path to your dataset and class names and nc count you want to fine tune your model.
You can rename the classes in data.yaml in English.
train: ../train/images
val: ../valid/images
test: ../test/images

nc: 4
names: ['Helmet', 'Shoes', 'Person', 'Jacket']

roboflow:
  workspace: menara
  project: personal-protection-detetction
  version: 4
  license: Public Domain
  url: https://universe.roboflow.com/menara/personal-protection-detetction/dataset/4
Fine tune YOLO11 Model
Next, load a pre-trained YOLO11 small object detection model from Ultralytics and train in on the PPE dataset. Here , image resolution is chosen as 320x320, you can configure it to your requirements.
# Load the pre-trained YOLO11 small model
model = YOLO('yolo11s.pt')
model.train(data='/content/dataset/data.yaml', epochs=100, imgsz=(320,320), name='ppe_yolo', augment=True )
Key parameters:
data: Path to your dataset configuration file (data.yaml).epochs: The number of training epochs (adjust based on your needs).imgsz: The image size (default is 640x640).name: The name of the training run.
Evaluate and Test the Model
Once training is completed, you can evaluate the model on the validation or test set:
metrics = model.val()
This will output evaluation metrics such as precision, recall, and mAP on your dataset.
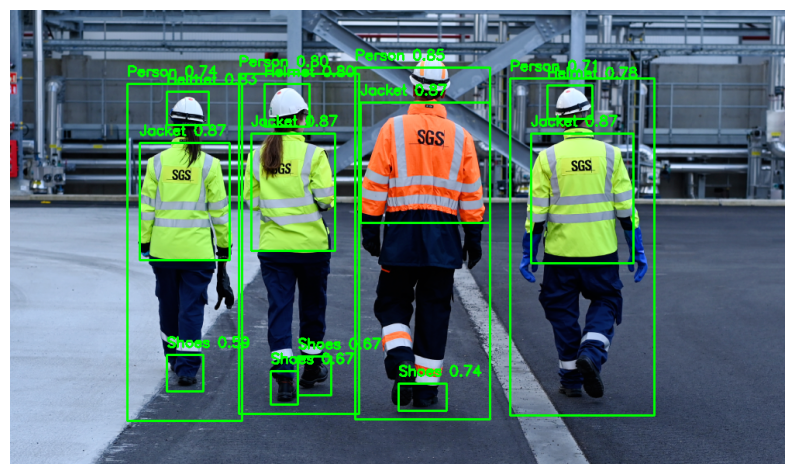
After the model is trained, lets test it on one of the images in the test set.
test_image =  '/content/dataset/test/images/KakaoTalk_20221018_001312059_02_jpg.rf.6d2847ebe3ed5ba086853613b775d41b.jpg'
results = model(test_image)

detected_image = results[0].plot()
# Convert the detected image from BGR to RGB for correct color display
detected_image_rgb = cv2.cvtColor(detected_image, cv2.COLOR_BGR2RGB)

plt.imshow(detected_image_rgb)
plt.axis('off')
plt.show()
Great, looks like your object detection model is finally fine tunned for PPE detection.
Save and Export the Model
You can save your model and export it TensorFlow lite float32 bit.
model.export(format='tflite', opset=12)
Download the tflite float32 model from runs/detect/ppe_yolo/weights/best_saved_model/best_float32.tflite.
Step 2: Optimize model for Astra Machina
Once, you have your model ready, lets optimize it for Machina's NPU of SL1680, by using SyNAP toolkit. This will optimize and quantize our model into a .synap format that can be run efficiently on NPU.
If you want to setup environment and Optimize a model on your local machine, you can follow this tutorial.
To save time on environment set-up, you can follow the below steps on a fresh Google Colab Notebook and upload your model here.
During Optimization, its best practice to provide a dataset in meta yaml with same resolution as your model's. Thus get a 320x320 image or download and resize the bus.jpg
Also make sure, the model resolution matches the values in shape and format in the meta yaml.
!pip install "https://github.com/synaptics-synap/toolkit/releases/download/v3.1.1/synap-3.1.1rc20240910203155-cp310-cp310-linux_x86_64.whl" --extra-index-url https://download.pytorch.org/whl/cpu
synap_yaml = """
inputs:
- format: rgb keep_proportions=1
  name: inputs_0
  scale: 255
  shape: [1, 320, 320, 3]
outputs:
- dequantize: true
  format: yolov8 w_scale=320 h_scale=320 bb_normalized=1
quantization:
  data_type: uint8
  dataset:
  - /content/bus320x320.jpg
  scheme: asymmetric_affine"""
with open('./synap.yaml', 'w') as file:
    file.write(synap_yaml)
!synap_convert --model /content/best_float32.tflite --target SL1680 --meta /content/synap.yaml --out-dir yolo
Step 3: Run Video Inference on Machina
Now to run this on Machina, copy the model you just compiled for Astra's NPU.
Also, since we fine-tunned our model having 4 labels, Create a label.json and copy it to Machina board as well.
{
    "labels": ["Helmet","Shoes","Person","Jacket"]
}
adb push ~/Downloads/model.synap /home/weston/model.synap
adb push ~/Downloads/label.json /home/weston/label.json
Now on Machina terminal, clone the Video inference examples repo from our Synap GitHub repo.
git clone https://github.com/synaptics-synap/examples.git
To run the Video Inference on some video, copy the a video video.mp4 and use command:
root@sl1680:/home/weston/examples/video_inference# python3 -m examples.infer_video -m /home/weston/model.synap -i /home/weston/video.mp4  /home/weston/label.json --fullscreen
Validating input...
Input OK
Validating model...
Model OK
Running pipeline...
Congratulations!
By following this tutorial, you have fine-tuned the YOLO11 small model to detect PPE and ran it on Astra Machina's NPU. For more advanced configurations, you can experiment with hyperparameters and explore different data augmentations to further enhance performance.