Model Quantization
In order to efficiently run a model on the NPU HW it has to be quantized. Quantization consists of reducing the precision of the weights and activations of the model, so that computations can be done using 8-bits or 16-bits integer values, instead of the much more computationally intensive 32 bits floating point. A common side-effect of quantization is often to reduce the accuracy of the results, so it must be done with care.
There are three ways in which a model can be quantized:
- During training: Using quantization-aware training features available in recent training frameworks such as TensorFlow and PyTorch. These techniques allow compensating for the reduced precision induced by quantization during the training phase itself, thus providing in principle better results.
- After training: Using the same training framework, to convert a trained floating point model into a quantized one (e.g., convert the model to a quantized
uint8.tflitemodel). The advantage of both these methods is that they benefit from advances in the quantization techniques in these frameworks and the generated model is still a standard model, so the effect of quantization can be tested and evaluated using standard tools. - When converting the model using the SyNAP toolkit: This is the most convenient way to quantize models outside any training framework and to take advantage of specific features of the SyNAP NPU and toolkit (e.g., 16-bits or mixed-type quantization).
In order to quantize a model, it is necessary to determine an estimate of the range of the output values of each layer. This can be done by running the model on a set of sample input data and analyzing the resulting activations for each layer. To achieve good quantization, these sample inputs should be as representative as possible of the entire set of expected inputs. For example, for a classification network, the quantization dataset should contain at least one sample for each class. Better quantization results can be achieved by providing multiple samples for each class, for example, in different conditions of size, color, and orientation. In the case of multi-input networks, each input must be fed with an appropriate sample at each inference.
Quantization Images Resize
The image files in the quantization dataset don't have to match the size of the input tensor. The SyNAP toolkit automatically resizes each image to fit the input tensor. Starting from SyNAP 2.6.0, this transformation is done by preserving the aspect ratio of the image content. If the image and the tensor have different aspect ratios, gray bands are added to the input image so that the actual content is not distorted. This corresponds to what is normally done at runtime and is important in order to achieve reliable quantization. The aspect ratio is not preserved if the format string of the corresponding input contains the keep_proportions=0 attribute: in this case, the image is simply resized to fill the entire input tensor.
Data Normalization
When a model is trained, the input data are often normalized in order to bring them to a range more suitable for training. It's quite common to bring them in a range [-1, 1] by subtracting the mean of the data distribution and dividing by the range (or standard deviation). A different mean value can be used for each channel.
In order to perform quantization correctly, it is important to apply the same transformation to the input images or input samples used. If this is not done, the model will be quantized using a data distribution that is not the same as that used during training (and during inference) with poor results. This information has to be specified in the means and scale fields in the conversion metafile and will be applied to all input image files in the quantization dataset for the corresponding input using the formula:
norm = (in - means[channel]) / scale
For data (.npy) files this is not done, it is assumed that they are already normalized.
In addition, the same transformation must also be applied at runtime on the input data when doing inference. If the model has been compiled with preprocessing enabled, data normalization is embedded in the model and will take place during inference inside the NPU. Otherwise, data has to be normalized in software. The Tensor class provides an assign() method that does exactly this, using the same means and scale fields specified in the conversion metafile (this method is smart enough to skip software normalization when normalization is embedded in the model).
Hardware and software normalization can be used interchangeably and provide the same result. NPU normalization is generally somewhat faster, but this has to be checked case by case. In the case of software normalization, using the same mean for all the channels or using a mean of 0 and scale of 1 can in some cases improve performance: for example, if affine quantization is used, the normalization and quantization formula (qval = (normalized_in + zero_point) * qscale) can become one the inverse of the other thus resulting in a very efficient direct data copy.
The Tensor::assign() method is optimized to handle each case in the most efficient way possible. If needed, this could be further improved by the customer by taking advantage of the ARM NEON SIMD instructions.
Quantization and Accuracy
As already noted, quantizing a model, even if done correctly, will often result in some sort of accuracy loss when compared to the original floating point model. This effect can be reduced by quantizing the model to 16 bits, but the inference time will be higher. As a rule of thumb, quantizing a model to 16 bits will double the inference time compared to the same model quantized to 8 bits.
The quantization errors introduced are not uniform across all the layers; they might be small for some layers and relevant for others. The Quantization Entropy is a measure of the error introduced in each layer.
A quantization_entropy.txt file can be generated by quantizing a model with the kl_divergence algorithm. This file will contain the quantization entropy for each weight and activation tensor in the network. It can be used as a guide to understand where errors are introduced in the network. Each entropy value is in the range [0, 1], the closer to 1 the higher the quantization error introduced. The kl_divergence algorithm is an iterative algorithm based on this paper and tries to minimize the Kullback-Leibler divergence between the original and quantized outputs. It is slower than the standard algorithm but can produce more accurate results.
The quantization error for problematic layers can be reduced by keeping them in float16 or quantizing them to 16 bits integer using mixed quantization.
Per-Channel Quantization
SyNAP supports per-channel quantization by specifying the perchannel_symmetric_affine quantization scheme. With this scheme, weights scales are computed per-channel (each channel has its own scale), while activations will still have a single scale and bias for the entire tensor as in asymmetric_affine quantization. When weight values distribution changes a lot from one channel to the other, having a separate scale for each channel can provide a more accurate approximation of the original weights and so an improved inference accuracy.
Mixed Quantization
Mixed quantization is a feature of the SyNAP toolkit that allows choosing the data type to be used for each layer when a network is quantized during conversion. This allows achieving a custom balance between inference speed and accuracy.
Different approaches are possible:
- Quantize the entire network to 16 bits and keep just the input in 8 bits. This provides the best accuracy possible and can be convenient when the input is an 8-bits image since it avoids the need to perform the 8-to-16 bits conversion in software (note that this is not needed if preprocessing is used as it will also take care of the type conversion).
- Quantize most of the network in 8 bits and just the problematic layers with
int16or evenfloat16. The quantization entropy can provide a guide to select the layers which would get more benefit from 16 bits. Note however that each change in data-type requires a conversion layer before and after it, so it is normally a good idea to avoid changing data-type too many times. - Quantize the initial part (backbone) of the network in
uint8and switch toint16for the last part (head). This is often a good choice when the input of the network is an 8-bits image, as networks should not be too sensitive in general to small noise in the input. Using 16 bits processing in the head allows computing the final results (e.g., bounding boxes) with much greater precision without adding too much in terms of inference time.
To see how this is done let's consider the very simple model in the following diagram:
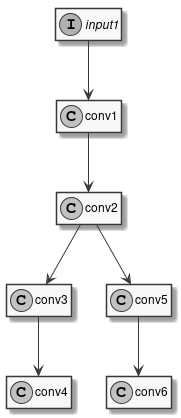
Figure 4 Sample Model
This model has one input and six convolutions. We've already seen how to compile it with uniform quantization, for example using 16 bits integers:
quantization:
    data_type: int16
Instead of a single type, the data_type field can contain an association map between layer-names and layer-types. Layer names are those that appear in the model to be converted, it's easy to see them using free tools such as Netron. So, the previous example is equivalent to:
quantization:
    data_type:
        input1: int16
        conv1: int16
        conv2: int16
        conv3: int16
        conv4: int16
        conv5: int16
        conv6: int16
To perform mixed-type quantization just select the desired type for each layer. The only limitation is that uint8 and int8 types can't be both present at the same time. For example, we can choose to quantize the input and first convolution to 8 bits, the internal convolutions to 16 bits, and to keep the final convolutions in floating point:
quantization:
    data_type:
        input1: uint8
        conv1: uint8
        conv2: int16
        conv3: int16
        conv4: float16
        conv5: int16
        conv6: float16
Real models can often have well above one hundred layers, so writing an exhaustive list of all the layers can become confusing and error-prone. To keep the type specification simpler there are a few shortcuts that can be used. First of all, layers can be omitted: layers not explicitly listed will be quantized by default to uint8. Furthermore, some special conventions in the layer name specification can help:
INPUTS: This special name is automatically expanded to the names of all the inputs of the network.*@layerId*: A name preceded by the@suffix is interpreted as a layerID (see note below).layername...: A name followed by three dots is expanded to the names of all the layers that follow the layer specified in the model (in execution order). Useful when, for example, we want to use the same data type for the head of the network or an entire branch.'*': Expanded to the names of all the layers that haven't been explicitly specified.
The type specifications are applied in the order they are declared (except for '*') so it is possible to further override the type of layers already specified.
During the compilation of a model several optimizations are applied and some layers in the original network may be fused together or optimized away completely. For optimized away layers it is of course not possible to specify the data type. For fused layers, the issue is that they will not have the same name as the original layers. In this case, it is possible to identify them by layerId: a layerId is a unique identifier assigned to each compiled layer. This is also a convenient way to identify layers in case the original model has layers with ambiguous or empty names. It is possible to see the list of all layerIDs for a compiled model in the generated quantization_info.yaml or quantization_entropy.txt file.
Let's see a few examples applied to our sample network.
# Quantize input1 as int8, everything else as int16
quantization:
    data_type:
        INPUTS: int8
        '*': int16
# Quantize as uint8 but use int16 for conv3, conv4, conv5, conv6
quantization:
    data_type:
        '*': uint8
        conv2...: int16
# Quantize as uint8 but use int16 for conv3, conv4, conv6 but float16 for conv5
quantization:
    data_type:
        '*': uint8
        conv2...: int16
        conv5: float16
In the two examples above, the specification '*': uint8 could have been avoided since uint8 is already the default, but helps in making the intention more explicit.
If we specify the data type for a layer that has been fused, we will get a "Layer name" error at conversion time. In this case, we have to look for the layerId of the corresponding fused layer in quantization_info.yaml and use the "@" syntax as explained above. For example, if in our sample model conv5 and conv6 have been fused, we will get an error if we specify the type for conv5 alone. Looking in quantization_info.yaml we can find the ID of the fused layer, as in: @Conv_Conv_5_200_Conv_Conv_6_185:weight.
We can then use this layer ID in the metafile to specify the data type of the fused layers:
# Quantize as uint8 but use int16 for conv3, conv4, conv6 but float16 for fused conv5+conv6
quantization:
    data_type:
        '*': uint8
        conv2...: int16
        '@Conv_Conv_5_200_Conv_Conv_6_185': float16