
Function Calling on SL2610-Series
Complete the Getting Started with SL2610 guide first. It covers setting up your board, cloning the examples, and creating the Python environment. Activate the environment with source .venv/bin/activate in each new terminal.
Function calling lets a language model turn a natural-language request into a structured call to a tool, so software and hardware can act on it. Instead of replying with text, the model decides which function to run and with which arguments.
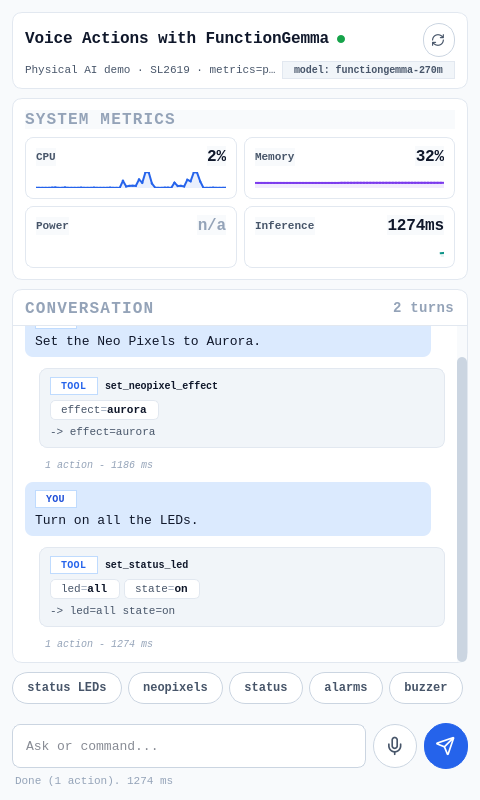
In this guide you run FunctionGemma 270M, fine-tuned to control the lights and buzzer on the Coralboard sensor add-on, entirely on the board. There is no cloud, no API key and no wake word. Speak or type "turn the red light on" and the board does it in about 1.3 to 2 seconds.
FunctionGemma and functional tokens
FunctionGemma is a small Gemma-based model from Google for tool routing. This demo's version is fine-tuned in the Octopus v2 style: each tool is a single token baked into the model weights, so no tool schema is needed in the prompt. The on-device prompt is only about 13 tokens, which keeps prefill fast on the 2-core Cortex-A55 CPU.
A compact codec turns the model output (for example <tool_0>(color="red", state="on")<end>) back into a tool call, and a dispatcher runs it on the hardware.
| Tool | What it does |
|---|---|
set_lights | Sets color, effect or on/off state on the sensor add-on status LEDs, or on an optional WLED Neopixel ring |
play_buzzer | Plays a named pattern (beep, double_beep, chirp, siren, alarm, success, error) |
set_alarm / cancel_alarm | Schedules or cancels alarms |
get_system_status | Reports CPU, memory, temperature or NPU status |
respond | Replies in natural language when no action fits |
Voice input is optional. When enabled, Silero VAD detects speech and Moonshine transcribes it on the Torq NPU, so speech recognition and the LLM do not compete for the same two CPU cores.
Run Function Calling on Astra
Hardware
- Synaptics Coralboard (SL2619) with the Grinn Coralboard sensor add-on (RGB status LEDs and piezo buzzer)
- Optional: a microphone (the sensor add-on PDM mic or any USB mic) for voice input
- Optional: Adafruit Sparkle Motion Mini (6314) running WLED firmware and a 48-pixel WS2812B ring (2539), connected over USB, for Neopixel light effects
Install the example-specific dependencies and download the model:
cd Function_calling
pip install -r requirements.txt
python setup_demo.py
Different examples need different versions of the Python Torq runtime. If you share one virtual environment between examples, re-run pip install -r requirements.txt from the example folder whenever you switch examples.
For voice input, also install the PortAudio system libraries once:
../setup/install_portaudio.sh
Function Calling on the edge
Run the command-line version
python3 run_cli.py
The model loads in about 3.5 seconds, then you get a prompt. Try a few commands:
>>> Turn the red light on
  set_lights: color=red state=on
  (1 tool call · 1821 ms)

>>> Play a siren
  play_buzzer: pattern=siren
  (1 tool call · 1374 ms)

>>> How much memory is free?
  get_system_status: {'memory': 38.4}
  (1 tool call · 1355 ms)
To run a single prompt and exit:
python3 run_cli.py --prompt "Turn the red light on"
Use one action per prompt. A 270M model emits a single tool call, so "beep twice and flash the green LED" will only perform one of the two.
Run the GUI
Set up the display environment from the Getting Started guide (XDG_RUNTIME_DIR and WAYLAND_DISPLAY), and add the Qt variables:
export QT_QPA_PLATFORM=wayland
export WESTON_DISABLE_GBM_MODIFIERS=true
For portrait mode on an 800x480 display:
export ORIENTATION=portrait
export DISPLAY_HEIGHT=800
export DISPLAY_WIDTH=480
Then start the PyQt app:
python3 run_gui.py
Add --fullscreen to fill a 7" panel. Press Esc to quit.
Add voice input
python3 run_gui.py --voice moonshine
The UI shows a Mic button. If you have a USB mic plugged in, pin the sensor add-on microphone with --mic 0 or select the USB mic with --mic USB. Use --voice stub to test the microphone path with canned phrases before enabling the real speech model.
Add Neopixel lights (optional)
Plug in the Sparkle Motion and confirm it appears as a serial device:
ls /dev/ttyACM*
python3 run_cli.py
The first /dev/ttyACM* device is auto-detected and set_lights commands are routed to the ring. Without a ring, they drive the three sensor add-on LEDs instead. Use --wled-port /dev/ttyACM1 to pick a specific device, or --no-wled to force sensor add-on-only mode.
Start automatically at boot
bash scripts/install-service.sh
This installs a systemd service that waits for Weston, sets the display variables and runs the GUI full-screen. Follow its log with journalctl -u functiongemma-demo -f.
Additional options to try
--model, path to a different GGUF model--voice {off,stub,moonshine}, voice input mode--mic, microphone device index or name substring--wled-port,--no-wled,--wled-baud, Neopixel serial settings--fullscreen, fill the screen (GUI only)
Models
This tutorial uses the following pre-compiled model for the SL2610-Series. See the model page for details, performance and download links:
Browse all models on the Models page.
Python walkthrough
The pieces are small and separated by role. Review these files to learn more:
llamacpp.py, a wrapper that loads the GGUF model with llama.cpp and runs generationcompact_codec.py, parses<tool_N>(args)<end>into a tool calldispatcher.py, validates the arguments againsttools.jsonand calls the matching method inhardware.pylights.py, routesset_lightsto the sensor add-on LEDs or the WLED ring depending on what is connected
On startup the app also switches the CPU governor to performance (cpu_governor.py). On the OOBE image the default governor is schedutil, which can slow the first response down by about 3x.