框架应用程序编程接口
Synap 框架的核心功能是执行预编译的神经网络。这是通过 Network 类实现的。Network 类的设计在最常见的情况下使用简单,同时对于大多数高级用例来说也足够灵活。实际的推理将根据模型的编译方式在不同的硬件单元(NPU、GPU、CPU 或它们的组合)上进行。
基本用法
Network 类
Network 类非常简单,如下图所示。
使用网络只能做两件事:
- 加载模型,提供
.synap格式的已编译模型。 - 执行推理。
网络还具有输入张量数组用于存放要处理的数据,以及输出张量数组用于在每次推理后包含结果。

图 5 Network 类
类 synaptics::synap::Network
在 NPU 加速器上加载和执行神经网络。
概要
| 函数 | 描述 |
|---|---|
bool load_model(const std::string &model_file, const std::string &meta_file = "") | 从文件加载模型。 |
bool load_model(const void *model_data, size_t model_size, const char *meta_data = nullptr) | 从内存加载模型。 |
bool predict() | 运行推理。 |
公共函数
bool load_model(const std::string &model_file, const std::string &meta_file = "")
- 加载模型。
- 如果之前已加载其他模型,在加载指定模型之前会先释放之前的模型。
- 参数:
model_file:.synap模型文件的路径。也可以是旧版.nb模型文件的路径。meta_file:对于旧版.nb模型,必须是模型元数据文件的路径(JSON 格式)。在所有其他情况下,必须是空字符串。
- 返回值:如果成功则返回
true。
bool load_model(const void *model_data, size_t model_size, const char *meta_data = nullptr)
- 加载模型。
- 如果之前已加载其他模型,在加载指定模型之前会先释放之前的模型。
- 参数:
model_data:模型数据,例如从model.synap通过fread()读取。调用者保留模型数据的所有权,可以在此方法结束时删除它们。model_size:模型大小(字节)。meta_data:对于旧版.nb模型,必须是模型的元数据(JSON 格式)。在所有其他情况下,必须是nullptr。
- 返回值:如果成功则返回
true。
bool predict()
- 运行推理。
- 从输入张量读取要处理的输入数据。推理结果生成在输出张量中。
- 返回值:如果成功则返回
true,如果推理失败或网络未正确初始化则返回false。
公共成员
Tensors *inputs*
- 输入张量的集合,可以通过索引访问和迭代。
Tensors *outputs*
- 输出张量的集合,可以通过索引访问和迭代。
使用网络
执行神经网络的先决条件是创建一个 Network 对象并加载其 .synap 格式的模型。此文件是使用 Synap 工具包转换网络时生成的。这只需要执行一次,加载网络后就可以用于推理:
- 将输入数据放入网络输入张量。
- 调用网络的
predict()方法。 - 从网络输出张量获取结果。
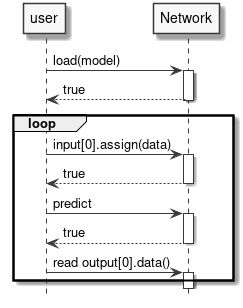
图 6 运行推理
示例
Network net;
net.load_model("model.synap");
vector[uint8_t](uint8_t) in_data = custom_read_input_data();
net.inputs[0].assign(in_data.data(), in_data.size());
net.predict();
custom_process_result(net.outputs[0].as_float(), net.outputs[0].item_count());
请注意:
- 权重和输入/输出数据的所有内存分配和对齐都由 Network 对象自动完成。
- 当 Network 对象被销毁时,所有内存都会自动释放。
- 为简单起见,省略了所有错误检查。如果出现问题,方法通常返回
false。不返回显式错误代码,因为错误通常太复杂,无法用简单的枚举代码解释。有关错误的详细信息可以在日志中找到。 - 示例中名为
custom_read_input_data的例程是用户代码的占位符。 - 在上面的代码中,将
in_data向量分配给张量时会进行数据复制。in_data向量中包含的数据不能直接用于推理,因为无法保证它们按照硬件要求正确对齐和填充。在大多数情况下,这种额外复制的成本可以忽略不计,当这不是问题时,有时可以通过直接写入张量数据缓冲区来避免复制,例如:
custom_generate_input_data(net.inputs[0].data(), net.inputs[0].size());
net.predict();
- 张量中的数据类型取决于网络的生成方式。常见的数据类型包括
float16、float32、量化的uint8和int16。assign()和as_float()负责处理所有必需的数据转换。
仅使用本节所示的简单方法,就可以使用 NPU 硬件加速器执行推理。这几乎是在大多数应用程序中使用 SyNAP 所需要知道的全部内容。以下各节将详细解释幕后发生的事情:这使得可以充分利用可用的硬件来处理更高要求的用例。
高级主题
张量
我们在上一节中看到,对网络输入和输出数据的所有访问都是通过张量对象完成的,因此值得详细了解 Tensor 对象可以做什么。基本上,张量允许:
- 获取有关所包含数据的信息和属性。
- 访问数据。
- 访问用于包含数据的底层
Buffer。更多内容将在下一节中介绍。

图 7 Tensor 类
类 synaptics::synap::Tensor
Synap 数据张量。
不可能在 Network 外部创建张量,用户只能访问由 Network 本身创建的张量。
概要
| 函数 | 描述 |
|---|---|
const std::string &name() const | 获取张量的名称。 |
const Shape &shape() const | 获取张量的形状。 |
const Dimensions dimensions() const | 获取张量的维度。 |
Layout layout() const | 获取张量的布局。 |
std::string format() const | 获取张量的格式。 |
DataType data_type() const | 获取张量数据类型。 |
Security security() const | 获取张量安全属性。 |
size_t size() const | 获取张量数据的字节大小。 |
size_t item_count() const | 获取张量中的项目数量。 |
bool is_scalar() const | 检查张量是否为标量。 |
bool assign(const uint8_t *data, size_t count) | 规范化并将数据复制到张量数据缓冲区。 |
bool assign(const int16_t *data, size_t count) | 与前一个 assign 函数类似,但用于 int16_t 数据。 |
bool assign(const float *data, size_t count) | 与前一个 assign 函数类似,但用于 float 数据。 |
bool assign(const void *data, size_t size) | 将原始数据复制到张量数据缓冲区。 |
bool assign(const Tensor &src) | 将张量的内容复制到张量数据缓冲区。 |
bool assign(int32_t value) | 将值写入张量数据缓冲区。 |
template[typename T](typename T) T *data() | 获取指向张量数据缓冲区内数据开始处的指针。 |
void *data() | 获取指向张量数据缓冲区内原始数据的指针。 |
const float *as_float() const | 获取指向转换为 float 的张量内容的指针。 |
Buffer *buffer() | 获取指向张量当前数据 Buffer 的指针。 |
bool set_buffer(Buffer *buffer) | 设置张量的当前数据缓冲区。 |
公共函数
const std::string &name() const
- 获取张量的名称。
- 在具有多个输入或输出的网络中,可以使用字符串而不是位置索引来标识张量时很有用。
- 返回值:张量名称。
const Shape &shape() const
- 获取张量的形状。
- 获取
Tensor的形状,即每个维度中的元素数量。 维度的顺序由张量布局指定。 - 返回值:张量形状。
const Dimensions dimensions() const
- 获取
Tensor的维度,即每个维度中的元素数量。 返回的值与张量布局无关。 - 返回值:张量维度(如果张量的秩不是 4,则全为 0)。
Layout layout() const
- 获取
Tensor的布局,即数据在内存中的组织方式。 SyNAP 支持两种布局:NCHW和NHWC。N 维度(样本数量)为了与标准约定兼容而存在,但必须始终为 1。 - 返回值:张量布局。
std::string format() const
- 获取
Tensor的格式,即数据表示的内容的描述。 这是一个自由格式的字符串,其含义取决于应用程序,例如,"rgb"、"bgr"。 - 返回值:张量格式。
DataType data_type() const
- 获取张量数据类型。整数类型用于表示量化数据。量化参数和量化方案的详细信息不直接可用,用户可以使用下面的
as_float()方法将量化数据转换为 32 位 float 来使用。 - 返回值:张量中每个项目的类型。
Security security() const
- 获取张量安全属性。
- 返回值:张量的安全属性(如果模型不安全则为 none)。
size_t size() const
- 返回值:张量数据的字节大小。
size_t item_count() const
- 获取张量中的项目数量。张量的
size()始终等于item_count()乘以张量数据类型的大小。 - 返回值:张量中的数据项目数量。
bool is_scalar() const
- 返回值:如果这是标量张量(即只包含一个元素)则返回
true。(标量张量的形状有一个维度,等于 1)。
bool assign(const uint8_t *data, size_t count)
- 规范化并将数据复制到张量数据缓冲区。
- 数据会被规范化并转换为张量的类型和量化方案。
数据数量必须等于张量的
item_count()。 - 参数:
data:指向要复制的数据的指针。count:要复制的数据项目数量。
bool assign(const int16_t *data, size_t count)
- 与前一个
assign函数类似,但用于int16_t数据。 - 返回值:如果成功则返回
true。
bool assign(const float *data, size_t count)
- 与前一个
assign函数类似,但用于float数据。 - 返回值:如果成功则返回
true。
bool assign(const void *data, size_t size)
- 将原始数据复制到张量数据缓冲区。数据被视为原始数据,因此不会进行规范化或转换。数据大小必须等于张量的
size()。 - 返回值:如果成功则返回
true。
bool assign(const Tensor &src)
- 将张量的内容复制到张量数据缓冲区。
- 不会进行规范化或转换;两个张量的数据类型和大小必须匹配。
- 参数:
src:包含要复制的数据的源张量。
- 返回值:如果成功则返回
true,如果类型或大小不匹配则返回false。
bool assign(int32_t value)
- 将值写入张量数据缓冲区。
- 仅当张量是标量时才有效。该值也会转换为张量数据类型:8、16 或 32 位整数。 在将值写入数据缓冲区之前,该值也会根据张量格式属性进行重新缩放(如果需要)。
- 参数:
value:要复制值。
- 返回值:如果成功则返回
true。
template[typename T](typename T) T *data()
- 获取指向张量数据缓冲区内数据的指针(如果可以直接访问)。
- 这仅在
T匹配张量的data_type()且不需要规范化/量化时才有效。示例用法:uint8_t* data8 = tensor.data[uint8_t](uint8_t)(); - 返回值:指向数据缓冲区内数据的指针或
nullptr。
void *data()
- 获取指向张量数据缓冲区内原始数据的指针(如果有)。
- 该方法返回一个
void指针,因为实际数据类型是data_type()方法返回的类型。 - 返回值:指向数据缓冲区内原始数据的指针,如果没有则返回
nullptr。
const float *as_float() const
- 获取指向转换为 float 的张量内容的指针。
- 该方法始终返回一个
float指针。如果张量的实际数据类型不是 float,则会在内部执行转换,因此用户不需要关心数据如何内部表示。请注意,这是一个指向浮点数据内部的张量指针:这意味着返回的指针不能释放,内存将在张量被销毁时自动释放。 - 返回值:指向
float[item_count()]数组的指针,表示转换为 float 的张量内容(如果张量没有数据则返回nullptr)。
Buffer *buffer()
- 获取指向张量当前数据
Buffer的指针(如果有)。 - 这将是张量的默认缓冲区,除非用户使用
set_buffer()分配不同的缓�冲区。 - 返回值:当前数据缓冲区或
nullptr(如果没有)。
bool set_buffer(Buffer *buffer)
- 设置张量的当前数据缓冲区。
- 缓冲区大小必须为 0 或匹配张量大小,否则将被拒绝(空缓冲区将自动调整为张量大小)。通常提供的缓冲区应至少与张量本身一样长。如果缓冲区对象在张量之前被销毁,它将自动取消设置,张量将保持缓冲区。
- 参数:
buffer:要用于此张量的缓冲区。缓冲区大小必须匹配张量大小(或为 0)。
- 返回值:如果成功则返回
true。
以下是张量中支持的所有数据类型列表:
enum class synaptics::synap::DataType
枚举值
| 枚举值 | 描述 |
|---|---|
enumerator invalid | 无效数据类型。 |
enumerator byte | 字节数据类型。 |
enumerator int8 | 8 位有符号整数。 |
enumerator uint8 | 8 位无符号整数。 |
enumerator int16 | 16 位有符号整数。 |
enumerator uint16 | 16 位无符号整数。 |
enumerator int32 | 32 位有符号整数。 |
enumerator uint32 | 32 位无符号整数。 |
enumerator float16 | 16 位浮点数。 |
enumerator float32 | 32 位浮点数。 |
缓冲区
用于存储张量数据的内存必须满足以下要求:
- 必须正确对齐
- 必须正确填充
- 在某些情况下必须是连续的
- 必须可由 NPU 硬件加速器以及 CPU 或其他硬件组件访问
使用 malloc()、new 或 std::vector 分配的内存不满足这些要求,因此不能直接用作 Network 的输入或输出。为此,Tensor 对象使用特殊的 Buffer 类来管理内存。每个张量内部都包含一个默认的 Buffer 对象,用于管理数据所用的内存。
Buffer 提供的 API 尽可能与 std::vector 的 API 相似。主要区�别在于缓冲区内容无法按索引访问,因为缓冲区只是原始内存的容器,没有数据类型。数据类型由使用缓冲区的张量持有。Buffer 还负责在销毁时释放已分配的内存(RAII),以避免内存泄漏。实际内存分配通过额外的 Allocator 对象完成,这允许在不同内存区域以不同属性分配内存。创建缓冲区对象时,除非指定了其他分配器,否则将使用默认分配器。分配器可以直接在构造函数中指定,也可以稍后使用 set_allocator() 方法指定。

图 8 Buffer 类
为了让缓冲区数据可在 CPU 和 NPU 硬件之间共享,需要执行一些额外操作以确保 CPU 缓存和系统内存正确对齐。当缓冲区内容用于网络推理时,这些操作会自动完成。在某些情况下,CPU 不会直接读写缓冲区数据,例如数据由其他硬件组件(如视频解码器)生成时。这种情况下,可以通过使用所提供的方法禁用 CPU 对缓冲区的访问来获得一定的性能提升。
可以创建引用现有内存区域的缓冲区,而不使用分配器。该内存必须已在 TrustZone 内核中注册,并且正确对齐和填充。Buffer 对象在销毁时不会释放该内存,因为内存归分配它的软件模块所有。
class synaptics::synap::Buffer
Synap 数据缓冲区。
概要
| 函数 | 描述 |
|---|---|
Buffer(Allocator *allocator = nullptr) | 创建空数据缓冲区。 |
Buffer(size_t size, Allocator *allocator = nullptr) | 创建并分配数据缓冲区。 |
Buffer(uint32_t mem_id, size_t offset, size_t size) | 引用现有内存区域。 |
Buffer(uint32_t handle, size_t offset, size_t size, bool is_mem_id) | 引用现有内存区域。 |
Buffer(const Buffer &rhs, size_t offset, size_t size) | 引用现有缓冲区内存区域的一部分。 |
Buffer(Buffer &&rhs) noexcept | 移动构造函数。 |
Buffer &operator=(Buffer &&rhs) noexcept | 移动赋值。 |
bool resize(size_t size) | 调整缓冲区大小。 |
bool assign(const void *data, size_t size) | 将数据复制到缓冲区。 |
size_t size() const | 获取实际数据大小。 |
const void *data() const | 获取实际数据。 |
bool allow_cpu_access(bool allow) | 启用/禁用 CPU 对缓冲区数据的访问。 |
bool set_allocator(Allocator *allocator) | 更换分配器。 |
公共函数
Buffer(Allocator *allocator = nullptr)
- 创建空数据缓冲区。
- 参数:
allocator:要使用的分配器(默认为基于 malloc 的分配器)。
Buffer(size_t size, Allocator *allocator = nullptr)
- 创建并分配数据缓冲区。
- 参数:
size:缓冲区大小。allocator:要使用的分配器(默认为基于 malloc 的分配器)。
Buffer(uint32_t mem_id, size_t offset, size_t size)
- 创建引用现有内存区域的数据缓冲区。
- 用户必须确保所提供的内存已正确对齐和填充。指定的内存区域在缓冲区销毁时不会被释放。调用者有责任在
Buffer销毁后释放mem_id。 - 参数:
mem_id:已在 TZ 内核中注册的现有内存区域的 ID。offset:内存区域内实际数据的偏移量。size:实际数据的大小。
Buffer(uint32_t handle, size_t offset, size_t size, bool is_mem_id)
- 创建引用现有内存区域的数据缓冲区。
- 用户必须确保所提供的内存已正确对齐和填充。指定的内存区域在缓冲区销毁时不会被释放。调用者有责任在
Buffer销毁后释放mem_id。 - 参数:
handle:现有 dmabuf 的 FD 或已在 TZ 内核中注册的mem_id。offset:内存区域内实际数据的偏移量。size:实际数据的大小。is_mem_id:如果第一个参数是mem_id则为true,如果是 FD 则为false。
Buffer(const Buffer &rhs, size_t offset, size_t size)
- 创建引用现有缓冲区内存区域一部分的数据缓冲区。
- 所提供缓冲区的内存必须已分配。为避免引用已释放内存,现有缓冲区内存在该缓冲区销毁之前不得被释放。
- 参数:
rhs:现有的Buffer。offset:Buffer内存区域内所需数据的偏移量。size:所需数据的大小。
Buffer(Buffer &&rhs) noexcept
- 移动构造函数。仅�适用于尚未被
Network使用的缓冲区。
Buffer &operator=(Buffer &&rhs) noexcept
- 移动赋值。仅适用于尚未被
Network使用的缓冲区。
bool resize(size_t size)
- 调整缓冲区大小。仅在提供了分配器时才可调整。之前的内容将丢失。
- 参数:
size:新的缓冲区大小。
- 返回值:如果成功则返回
true。
bool assign(const void *data, size_t size)
- 将数据复制到缓冲区。如果输入数据大小与当前缓冲区大小相同则始终成功;否则,在可能的情况下会调整缓冲区大小。
- 参数:
data:指向要复制数据的指针。size:要复制数据的大小。
- 返回值:如果成功则返回
true。
size_t size() const
- 获取实际数据大小。
const void *data() const
- 获取实际数据。
bool allow_cpu_access(bool allow)
- 启用/禁用 CPU 读写缓冲区数据的能力。
- 默认情况下,CPU 对数据的访问是启用的。当 CPU 不需要读写缓冲区数据时,可以禁用 CPU 访问,这在数据仅由其他硬件组件生成/使用时可带来一定性能提升。
在 CPU 访问被禁用时读写缓冲区数据可能导致缓冲区中的数据丢失或损坏。
- 参数:
allow:false表示 CPU 不会访问缓冲区数据。
- 返回值:当前设置。
bool set_allocator(Allocator *allocator)
- 更换分配器。仅在缓冲区为空时才可执行。
- 参数:
allocator:分配器。
- 返回值:如果成功则返回
true。
分配器
为缓冲区对象提供了两种分配器:
- 标准分配器:这是未显式指定分配器时缓冲区使用的默认分配器。内存是分页的(非连续的)。
- CMA 分配器:分配连续内存。某些硬件组件需要连续内存,且当输入/输出缓冲区非常大时,可提供一定的性能提升,因为处理内存页面所需的开销更少。使用时需格外谨慎,因为系统中可用的连续内存非常有限。
Allocator *standard_allocator()
- 返回指向系统标准分配器的指针。
Allocator *contiguous_allocator()
- 返回指向系统连续内存分配器的指针。
上述调用返回的是全局对象的指针,因此使用后不得删除。
进阶示例
访问张量数据
张量数据通常使用 Tensor::assign(const T* data, size_t count) 方法写入。该方法会处理从类型 T 到网络内部表示所需的数据规范化和类型转换。
类似地,输出数据通常使用 Tensor::as_float() 方法读取,该方法提供指向张量数据的指针,将其从内部表示转换为浮点值。
这些转换即使经过优化,也存在与数据大小成正比的运行时开销。对于输入数据,可以通过直接在张量数据缓冲区中生成数据来避免这一开销,但这仅在张量数据类型与输入数据类型匹配且不需要额外规范化/量化时才可行。张量提供了类型安全的 data[T](T)() 访问方法,仅在满足上述条件时才返回指向张量数据的指针,例如:
uint8_t* data_ptr = net.inputs[0].data[uint8_t](uint8_t)();
if (data_ptr) {
   custom_generate_data(data_ptr, net.inputs[0].item_count());
}
如果张量中的数据不是 uint8_t,或者需要规范化/[反]量化,则返回值将为 nullptr。这种情况下,无法直接写入或读取,需要使用 assign() 或 as_float()。
始终可以使用原始 data() 访问方法绕过所有检查直接访问数据:
void* in_data_ptr = net.inputs[0].data();
void* out_data_ptr = net.outputs[0].data();
同样,也可以使用 void* 数据指针直接赋值原始数据(不进行任何转换):
const void* in_raw_data_ptr = ....;
net.inputs[0].assign(in_raw_data_ptr, size);
在这些情况下,用户有责任了解数据的表示方式及处理方法。
设置缓冲区
如果默认张量缓冲区的属性不合适,用户可以显式创建新缓冲区并替换默认缓冲区。例如,假设我们想使用具有连续内存的缓冲区:
Network net;
net.load_model("model.synap");

// 用使用连续内存的缓冲区替换默认缓冲区
Buffer cma_buffer(net.inputs[0].size(), contiguous_allocator());
net.inputs[0].set_buffer(&cma_buffer);

// 像往常一样执行推理
custom_generate_input_data(net.inputs[0].data(), net.inputs[0].size());
net.predict();
设置默认缓冲区属性
比上一节所示替换张量缓冲区更简单的替代方案,是直接更改默认张量缓冲区的属性。这只能在开始时、访问张量数据之前完成:
Network net;
net.load_model("model.synap");

// 为 input[0] 的默认缓冲区使用连续分配器
net.inputs[0].buffer()->set_allocator(contiguous_allocator());

// 像往常一样执行推理
custom_generate_input_data(net.inputs[0].data(), net.inputs[0].size());
net.predict();
��缓冲区共享
如果多个网络需要处理相同的输入数据,可以在它们之间共享同一个缓冲区,从而避免冗余的数据复制:
Network net1;
net1.load_model("nbg1.synap");
Network net2;
net2.load_model("nbg2.synap");

// 为两个网络使用共同的输入缓冲区(假设输入大小相同)
Buffer in_buffer;
net1.inputs[0].set_buffer(&in_buffer);
net2.inputs[0].set_buffer(&in_buffer);

// 像往常一样执行推理
custom_generate_input_data(in_buffer.data(), in_buffer.size());
net1.predict();
net2.predict();
另一个有趣的缓冲区共享场景是:一个网络的输出需要直接由另一个网络处理。例如,第一个网络执行预处理,第二个网络执行实际推理。这种情况下,将第一个网络的输出缓冲区设置为第二个网络的输入缓冲区,可以完全避免数据复制(两个张量的大小当然必须相同)。此外,由于 CPU 无需访问这些中间数据,禁用对该缓冲区的访问很方便,可避免不必要的缓存刷新开销并进一步提升性能。
Network net1;
net1.load_model("nbg1.synap");
Network net2;
net2.load_model("nbg2.synap");

// 将 net1 输出用作 net2 输入。禁用 CPU 访问以提升性能。
net1.outputs[0].buffer()->allow_cpu_access(false);
net2.inputs[0].set_buffer(net1.outputs[0].buffer());

// 像往常一样执行推理
custom_generate_input_data(net1.inputs[0].data(), net1.inputs[0].size());
net1.predict();
net2.predict();
最后一种情况是:第一个网络的输出比第二个网络的输入小,但我们仍希望避免复制。例如,net1 的输出是 640x360 的图像,我们想将其生成在 net2 输入中,而 net2 期望 640x480 的图像。这种情况下,由于两个张量大小不匹配,上述缓冲区共享方案无法使用。我们需要的是共享两个缓冲区所用内存的一部分。
Network net2;  // 重要:必须先声明,以便在 net1 之后销毁
net2.load_model("nbg2.synap");
Network net1;
net1.load_model("nbg1.synap");

// 在仍有 CPU 访问权限时初始化整个目标张量
memset(net2.inputs[0].data(), 0, net2.inputs[0].size());

// 用引用 net2 输入缓冲区(部分)内存的新缓冲区替换 net1 输出缓冲区
*net1.outputs[0].buffer() = Buffer(*net2.inputs[0].buffer(), 0, net2.outputs[0].size());

// 禁用 CPU 访问以提升性能
net1.outputs[0].buffer()->allow_cpu_access(false);
net2.inputs[0].buffer()->allow_cpu_access(false);

// 像往常一样执行推理
custom_generate_input_data(net1.inputs[0].data(), net1.inputs[0].size());
net1.predict();
net2.predict();
由于 net1 输入张量现在使用 net2 分配的内存,因此 net1 必须在 net2 之前销毁;否则,它将指向已释放的内存。此限制将在下一个版本中修复。
缓冲区复用
用户可以随时显式设置网络中每个张量要使用的缓冲区。与创建新缓冲区相比,此操作的开销非常低,因此可以在每次推理时更换张量关联的缓冲区。
尽管如此,创建缓冲区并首次将其设置到张�量的开销相当高,因为涉及多次内存分配和验证。虽然可以在每次推理时创建新的 Buffer,但这种方式已不推荐;更好的做法是提前创建所需缓冲区,然后仅使用 set_buffer() 来选择使用哪个。
以下示例展示了在处理当前数据的同时准备下一批数据的场景:
Network net;
net.load_model("model.synap");

// 创建两个输入缓冲区
const size_t input_size = net.inputs[0].size();
vector[Buffer](Buffer) buffers { Buffer(input_size), Buffer(input_size) };

int current = 0;
custom_start_generating_input_data(&buffers[current]);
while (true) {
    custom_wait_for_input_data();

    // 在处理当前数据的同时填充另一个缓冲区
    net.inputs[0].set_buffer(&buffers[current]);
    current = !current;
    custom_start_generating_input_data(&buffers[current]);
    net.predict();
    custom_process_result(net.outputs[0]);
}
使用 BufferCache
有些情况下,待处理数据来自其他组件,每次从固定块池中提供一个数据块,每个块可通过 ID 或地址唯一标识。例如,提供帧数据的视频流水线就是这种情况。
此场景下处理流程如下:
- 获取下一个待处理块。
- 如果是第一次看到该块,则为其创建新的
Buffer并添加到集合中。 - 从集合中获取对应该块的
Buffer。 - 将其设置为输入张量的当前缓冲区。
- 执行推理并处理结果。
集合的存在是为了避免每次创建新 Buffer 的昂贵操作。这并不难编写,但步骤 2 和 3 始终相同。BufferCache 模板负责处理所有这些。模板参数允许指定用于标识接收块的类型,例如 BlockID 或直接是内存区域的地址。
在这种情况下,缓冲区内存不由 Buffer 对象分配。用户有责任确保所有数据已正确填充和对齐。此外,缓冲区缓存不取得数据块的所有权;用户有责任在 BufferCache 删除后及时释放它们。
复制与移动
Network、Tensor 和 Buffer 对象在内部访问硬件资源,因此不能被复制。例如:
Network net1;
net1.load_model("model.synap");
Network net2;
net2 = net1;  // 错误,不允许复制网络
但是,Network 和 Buffer 对象可以被移动,因为这没有额外开销,且在创建点和使用点不同时很方便。示例:
Network my_create_network(string nb_name, string meta_name) {
    Network net;
    net.load(nb_name, meta_name);
    return net;
}

void main() {
    Network network = my_create_network("model.synap");
    ...
}
Tensor 对象不具备相同功能;它们只能存在于自己的 Network 内部。
NPU 锁定
应用程序可以决定为自己独占保留 NPU。这对于有严格延迟要求的实时应用(如视频或音频流处理)非常有用。
NPU 锁定可在两个层级进行:
- 使用
Npu::lock()为当前进程保留 NPU 访问权限。 - 将 NPU 保留为仅离线使用(即禁用来自 NNAPI 的 NPU 访问)。
NPU 锁定
NPU 锁定是按进程进行的,这意味着一旦调用 Npu::lock() API,其他进程将无法在 NPU 上运行推理。其他进程仍然可以加载网络,但如果尝试进行离线或在线 NNAPI 推理,或再次 lock() NPU,将会失败。
锁定 NPU 的进程是唯一有权解锁它的进程。如果具有不同 PID 的进程尝试 unlock() NPU,该操作将被忽略,不会产生任何效果。
目前没有办法测试 NPU 是否已被其他进程锁定。唯一的可能性是尝试 lock() NPU。如果此操作失败,则意味着 NPU 已被另一个进程锁定或因某些故障而不可用。
如果持有 NPU 锁的进程因任何原因终止,锁将自动释放。
NNAPI 锁定
进程可以将 NPU 保留为仅离线使用,使任何人都无法通过 NNAPI 在 NPU 上运行在线推理。其他进程仍然可以在 NPU 上运行离线推理。SyNAP 没有专用 API 来实现这一功能,可以通过使用标准 Android API __system_property_set() 或 android::base::SetProperty() 将属性 vendor.NNAPI_SYNAP_DISABLE 设置为 1 来禁用 NNAPI。示例代码见 Android 源码中的 setprop.cpp 文件。
另请参阅:从 NNAPI 禁用 NPU 使用
仍然可以使用 timvx tflite 委托在 NPU 上执行在线推理。
描述
Npu 类控制 NPU 的锁定和解锁。通常只需在应用程序启动时创建一个该类的对象,并在应用程序即将终止时销毁它。

图 9 NPU 类
class synaptics::synap::Npu
保留 NPU 使用权。
概要
| 函数 | 描述 |
|---|---|
bool available() const | 检查 NPU 是否成功初始化。 |
bool lock() | 为当前进程锁定执行推理的独占权限。 |
bool unlock() | 释放执行推理的独占权限。 |
bool is_locked() const | 检查当前是否持有 NPU 锁。 |
公共函数
bool available() const
- 检查 NPU 是否成功初始化。
- 返回值:如果 NPU 成功初始化则返回
true。
bool lock()
- 为当前进程锁定执行推理的独占权限。
- 所有其他尝试执行推理的进程将失败,包括使用 NNAPI 的进程。
锁将保持有效,直到调用
unlock()或Npu对象被删除。 - 返回值:
true表示 NPU 成功锁定。在已锁定的Npu对象上调用此方法无效,只返回true。false表示 NPU 不可用或已被其他进程锁定。
bool unlock()
- 释放执行推理的独占权限。
- 返回值:
true表示成功。在未锁定的Npu对象上调用此方法无效,只返回true。
bool is_locked() const
- 检查当前是否持有 NPU 锁。
- 注意:测试 NPU 是否被其他人锁定的唯一方法是尝试
lock()它。 - 返回值:如果当前持有 NPU 锁则返回
true。
struct Private
- Npu 私有实现。
Npu 类使用 RAII 技术,这意味着当该类的对象被销毁且它正在锁定 NPU 时,NPU 会自动解锁。这有助于确保程序终止时 NPU 在所有情况下都被解锁。
示例用法
以下图表展示了 NPU 锁定 API 的一些使用示例。
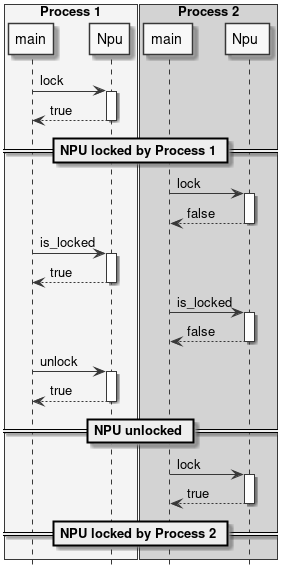
图 10 锁定 NPU
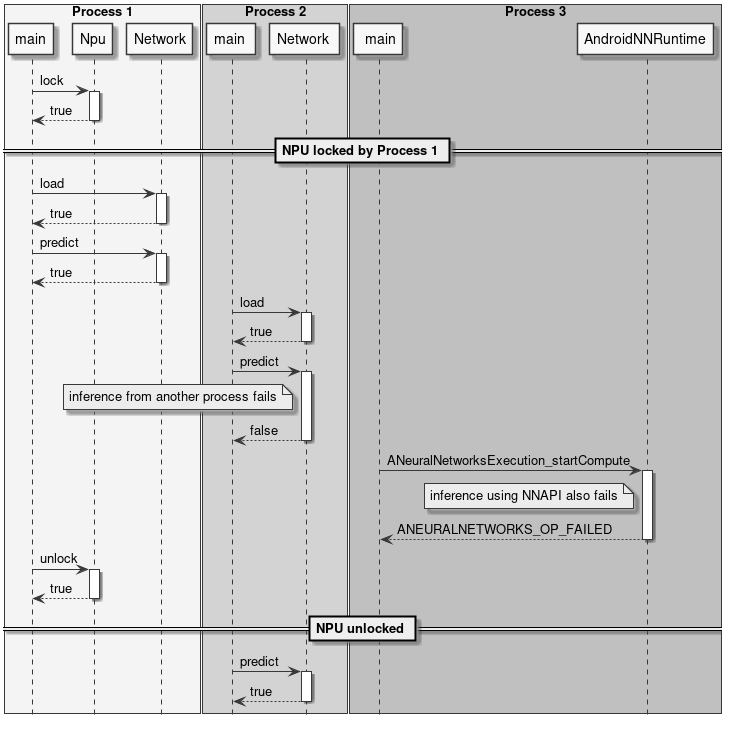
图 11 锁定与推理
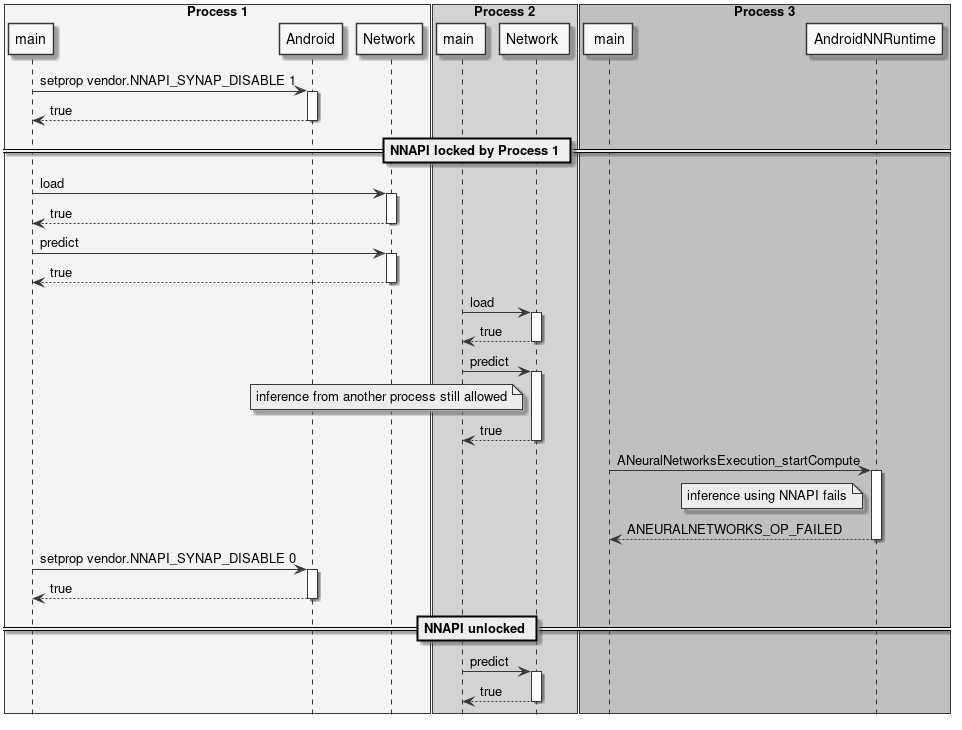
图 12 锁定 NNAPI
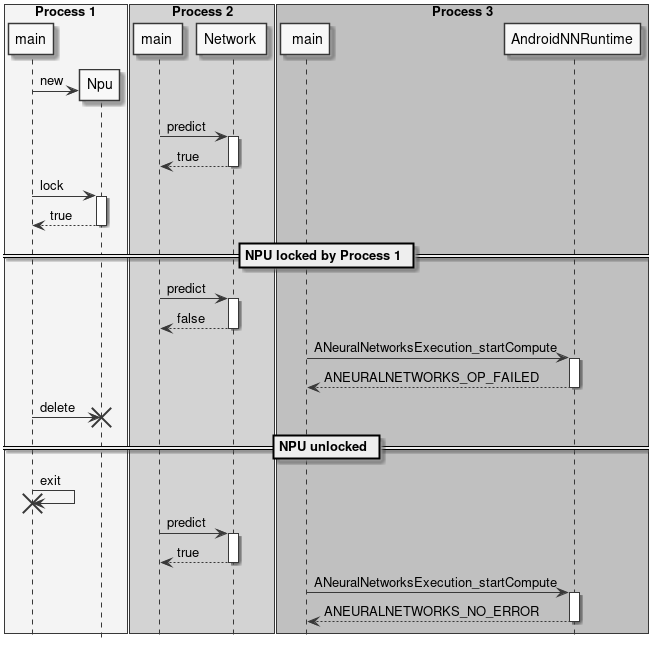
图 13 自动锁释放
预处理与后处理
使用神经网络时,输入和输出数据很少以原始格式直接使用。通常需要对输入数据进行转换,使其匹配网络所期望的格式。这一步骤称为预处理。
图像预处理的示例包括:
- 将输入图像缩放和/或裁剪到网络期望的尺寸。
- 将平面格式转换为交错格式,或反之。
- 将 RGB 转换为 BGR,或反之。
- 应用均值和尺度归一化。
这些操作可以在推理时使用 NPU 执行(通过在使用 SyNAP 工具包转换模型时启用预处理),也可以在将数据分配给网络时通过软件执行。
类似地,网络输出张量中的推理结果通常需要进一步处理才能变得可用。这一步骤称为后处理。在某些情况下,后处理在复杂性和计算时间方面都是不可忽视的步骤。
后处理的示例包括:
- 将量化数据转换为浮点表示。
- 分析网络输出以提取最重要的元素。
- 合并多个输出张量的数据以获得有意义的结果。
本节中的类不是 SyNAP API 的一部分;它们主要作为实用类,通过组合上述预处理-推理-后处理三个步骤来帮助编写 SyNAP 应用程序。
提供了完整的源代码,可作为用户扩展的参考实现。
InputData 类
InputData 类的主要作用是封装实际输入数据,并补充额外信息以指定数据所代表的内容及其组织方式。当前实现主要针对图像数据。
InputData 功能包括:
- 读取原始文件(二进制)。
- 从文件或内存读取并解析图像(jpeg 或 png)。
- 获取图像属性,如尺寸和布局。
输入文件名直接在构造函数中指定,无法更改。作为文件名的替代,如果内容已在内存中可用,也可以指定内存地址。
不执行任何数据转换。即使对于 jpeg 或 png 图像,数据也保持原始形式。

图 14 InputData 类
示例:
Network net;
net.load_model("model.synap");
InputData image("sample_rgb_image.dat");
net.inputs[0].assign(image.data(), image.size());
net.predict();
custom_process_result(net.outputs[0]);
Preprocessor 类
该类以 InputData 对象为输入,通过执行所有必要的转换将其内容分配给网络的输入张量。所需转换通过读取张量本身的属性自动确定。
支持的转换包括:
- 图像解码(jpeg、png 或 nv21 转 rgb)
- 布局转换:nchw 转 nhwc,或反之
- 格式转换:rgb 转 bgr 或灰度
- 图像裁剪(如果编译模型时启用了带裁剪的预处理)
- 图像缩放以适应张量尺寸
转换(如需要)在将 InputData 对象分配给 Tensor 时执行。
仅在编译模型中启用且使用多张量分配 API 时才执行裁剪:Preprocessor::assign(Tensors& ts, const InputData& data)。
缩放默认保留输入图像的宽高比。如果目标张量高于缩放后的输入图像,则在顶部和底部添加灰色条带。如果目标张量宽于缩放后的输入图像,则在左侧和右侧添加灰色条带。可以使用输入张量格式字符串中的 fill_color=N 选项配置填充的灰度级,其中 N 是 0(黑色)到 255(白色)之间的整数。
可以通过在输入张量格式字符串中指定 keep_proportions=0 选项来禁用宽高比保留。这种情况下,输入图像将直接缩放以匹配张量大小。
Preprocessor 类使用 CPU 执行预处理。如果提前知道要进行的转换,可以通过在转换网络时添加预处理层来使用 NPU 执行,详见预处理文档。
ImagePostprocessor 类
ImagePostprocessor 功能包括:
- 读取一组张量的内容。
- 将张量的原始内容转换为标准表示(目前仅支持
nv21)。原始内容的格式通过读取张量本身的属性自动确定。例如,在某些超分辨率网络中,输出图像的不同分量(y、uv)在单独的输出中提供。转换后的数据在标准向量中可用。

图 15 ImagePostprocessor 类
示例:
Preprocessor preprocessor;
Network net;
ImagePostprocessor postprocessor;

net.load_model("model.synap");
InputData image("sample_image.jpg");
preprocessor.assign(net.inputs[0], image);
net.predict();
// 转换为 nv21
ImagePostprocessor::Result out_image = postprocessor.process(net.outputs);
binary_file_write("out_file.nv21", out_image.data.data(), out_image.data.size());
Classifier 类
Classifier 类是图像分类网络常见用例的后处理器。
使用分类器只能做两件事:
- 初始化它。
- 处理网络输出:这将返回按置信度降序排列的可能分类列表,每个分类包含以下信息:
- class_index(类别索引)
- confidence(置信度)

图 16 Classifier 类
class synaptics::synap::Classifier
Network 输出张量的分类后处理器。
确定图像的前 N 个分类。
概要
| 函数 | 描述 |
|---|---|
inline Classifier(size_t top_count = 1) | 初始化分类器的构造函数。 |
Result process(const Tensors &tensors) | 对网络输出张量执行分类。 |
公共函数
inline Classifier(size_t top_count = 1)
- 构造函数。
- 参数:
top_count:要返回的最可能分类的数量。
Result process(const Tensors &tensors)
- 对网络输出张量执行分类。
- 参数:
tensors:网络的输出张量,tensors[0] 应包含每个图像类别的置信度列表。
- 返回值:分类结果。
struct Result
- 分类结果。
Result 的公共成员
bool success = {}
- 分类成功为 True,失败为 False。
std::vector[Item](Item) items
- 输入的可能分类列表,按置信度降序排列,即 items[0] 是置信度最高的分类。
- 分类失败时为空。
struct Item
分类条目。
Item 的公共成员
int32_t class_index
- 类别的索引。
float confidence
- 分类的置信度,通常在 [0, 1] 范围内。
示例:
Preprocessor preprocessor
Network net;
Classifier classifier(5);
net.load_model("model.synap");
InputData image("sample_image.jpg");
preprocessor.assign(net.inputs[0], image);
net.predict();
Classifier::Result top5 = classifier.process(net.outputs);
分类网络输出张量的标准内容是一个概率列表,每个类别对应一个概率(可能包含一个初始元素表示"背景"��或"未识别"类别)。在某些情况下,模型的最终 SoftMax 层被删除以提升推理速度:这种情况下,输出值不能再被解释为概率,但由于 SoftMax 是单调的,这不会改变分类结果。后处理可以使用转换元文件中对应输出的 format 字段进行参数化:
| 格式类型 | 输出编号 | 形状 | 描述 |
|---|---|---|---|
| confidence_array | 0 | NxC | 概率列表,每个类别一个 |
| 属性 | 默认值 | 描述 |
|---|---|---|
| class_index_base | 0 | 对应输出向量第一个元素的类别索引 |
其中:
- N:样本数量,必须为 1。
- C:识别的类别数量。
Detector 类
Detector 类是目标检测网络常见用例的后处理器。这里目标是一个通用术语,可以指实际物体、人或任何用于训练网络的内容。
使用检测器只能做两件事:
- 初始化它。
- 运行检测:这将返回一个检测条目列表,每个条目包含以下信息:
- class_index(类别索引)
- confidence(置信度)
- bounding box(边界框)
- landmarks(关键点,可选)

图 17 Detector 类
class synaptics::synap::Detector
目标检测器。
目标检测网络的输出格式并不总是相同的,取决于所使用的网络架构。格式类型必须在网络编译时在元文件的输出张量 format 字段中指定。
当前支持以下格式:retinanet_boxes、tflite_detection_boxes、yolov5。
概要
| 函数 | 描述 |
|---|---|
Detector(float score_threshold = 0.5, int n_max = 0, bool nms = true, float iou_threshold = .5, bool iou_with_min = false) | 构造函数。 |
bool init(const Tensors &tensors) | 初始化检测器。 |
Result process(const Tensors &tensors, const Rect &input_rect) | 对网络输出张量执行检测。 |
公共函数
Detector(float score_threshold = 0.5, int n_max = 0, bool nms = true, float iou_threshold = .5, bool iou_with_min = false)
- 构造函数。
- 参数:
score_threshold:低于此分数的检测将被丢弃。n_max:最大检测数量(0 表示全部)。nms:如果为 true,则应用非极大值抑制以去除重复检测。iou_threshold:交并比阈值(当nms为 true 时使用)。iou_with_min:使用最小面积代替并集来计算交并比。
bool init(const Tensors &tensors)
- 初始化检测器。如果未调用,检测器将在第一次调用
process()时自动初始化。 - 参数:
tensors:网络的输出张量(在网络加载后)。
- 返回值:如果成功则返回
true。
Result process(const Tensors &tensors, const Rect &input_rect)
- 对网络输出张量执行检测。
- 参数:
tensors:网络的输出张量。input_rect:输入(子)图像的坐标(用于计算边界框)。
- 返回值:检测结果。
class Impl
子类:DetectorBoxesScores、DetectorTfliteODPostprocessOut、DetectorYoloBase、DetectorYolov5Pyramid
struct Result
目标检测器结果。
struct Result 的公共成员
bool success = {}
- 检测成功为 True,检测失败为 False。
std::vector[Item](Item) items
- 每个检测对应一个条目。
- 如果未检测到任何内容或检测失败,则为空。
struct Item
检测条目。
struct Item 的公共成员
int32_t class_index
- 目标类别的索引。
float confidence
- 检测的置信度,范围为
[0, 1]。
Rect bounding_box
- 左上角坐标加上水平和垂直尺寸(以像素为单位)。
std::vector[Landmark](Landmark) landmarks
- 每个关键点对应一个条目。
- 如果没有可用关键点则为空。
示例:
Preprocessor preprocessor
Network net;
Detector detector;
net.load_model("model.synap");
InputData image("sample_image.jpg");
Rect image_rect;
preprocessor.assign(net.inputs[0], image, &image_rect);
net.predict();
Detector::Result objects = detector.process(net.outputs, image_rect);
传递给 process() 方法的矩形参数用于计算相对于原始图像的边界框和关键点坐标,即使图像在分配给网络输入张量时已被缩放和/或裁剪。
后处理包括以下步骤:
- 对于输入网格中的每个可能位置,计算该处最高类别的分数。
- 如果该分数过低,则在该位置未检测到任何内容。
- 如果超过检测阈值,则通过结合锚点位置、网络的回归增量以及输入图像的实际尺寸来计算目标的实际边界框。
- 计算所有检测结果后,使用非极大值抑制(NMS)算法过滤虚假的重叠检测,仅保留每个位置得分最高的一个。NMS 过滤仅适用于重叠面积超过最小阈值的边界框。重叠本身使用交并比公式计算(Intersection Over Union)。为了对不同大小的框提供更多过滤,计算中有时用"最小"面积替代"并集"面积。SyNAP Detector 实现了两种公式。
目标检测网络输出张量的内容没有标准化。主要检测网络家族存在多种格式,每个家族内还有变体。包含的信息始终相同;变化的是它们的组织方式。Detector 类目前支持以下输出格式:
retinanet_boxestflite_detection_inputtflite_detectionyolov5yolov8
上述列表中的所需标签必须放置在转换元文件中网络第一个输出张量的 "format" 字段中,以便 Detector 知道如何解释输出。
-
retinanet_boxes是 Synaptics 示例检测网络使用的输出格式(例如,用于 COCO 检测的 mobilenet224_full80 和用于人员检测的 mobilenet224_full1)。 -
tflite_detection_input是TFLite_Detection_PostProcess层的输入张量格式,例如用于 ssd_mobilenet_v1_1_default_1.tflite 目标检测模型。
当转换时从网络中删除 TFLite_Detection_PostProcess 层且对应的后处理算法在软件中执行时,使用此格式。
上述两种情况下,模型都有两个输出张量:第一个是回归张量,包含输入网格每个位置中得分最高的检测目标的边界框增量;第二个是分类张量,对每个类别包含该类别的分数,即该类别存在于输入网格对应位置的置信度。
-
tflite_detection是TFLite_Detection_PostProcess层输出张量的格式,例如用于 ssd_mobilenet_v1_1_default_1.tflite 目标检测模型。 -
yolov5是基于著名 yolov5 架构的模型使用的输出格式。这种情况下,模型有一个单一的 3D 输出张量,组织为检测列表,每个检测包含以下字段:- 边界框增量(x, y, w, h)
- 该检测的总体置信度
- 关键点增量(x, y)(如果模型支持)
- 置信度向量,每个类别一个条目
-
yolov8是基于 yolov8 架构的模型使用的输出格式,这是 yolo 家族的最新更新。输出张量的组织方式与上述yolov5非常相似,唯一的区别是缺少总体置信度字段。
在某些情况下,模型中的最终层可以在 CPU 上更高效地执行,因此在使用 SyNAP 工具包生成或编译模型时会被删除。这种情况下,网络将为图像金字塔的每个元素(通常为 3 个)提供一个输出张量,每个输出将是 4D 或 5D 张量,其布局�取决于模型被精确截断的位置。
SyNAP Detector 能够自动推断所用的布局,只需指示张量中的信息是否已转置。
| 格式类型 | 输出编号 | 形状 | 描述 | 备注 |
|---|---|---|---|---|
| retinanet_boxes | 0 | Nx4 | 边界框增量 | |
| 1 | NxC | 每类概率 | ||
| tflite_detection_input | 0 | Nx4 | 边界框增量 | |
| tflite_detection_boxes | 1 | NxC | 每类概率 | |
| tflite_detection | 0 | NxMx4 | 边界框 | |
| 1 | NxM | 检测类别的索引 | ||
| 2 | NxM | 检测类别的分数 | ||
| 3 | 1 | 实际检测数量 | ||
| yolov5 | 0..P-1 | NxTxD | 在模型中完成处理 | |
| NxHxWxAxD | 每个金字塔元素一个 5D 张量 | |||
| NxHxWx(A*D) | 每个金字塔元素一个 4D 张量 | |||
| NxAxHxWxD | 每个金字塔元素一个 5D 张量 | 需要 transposed=1 | ||
| NxAxDxHxW | 每个金字塔元素一个 5D 张量 | 需要 transposed=1 | ||
| Nx(A*D)xHxW | 每个金字塔元素一个 4D 张量 | 需要 transposed=1 | ||
| yolov8 | 0 | NxTxD | 在模型中完成处理 | 缺少总体置信度 |
其中:
- N:样本数量,必须为 1
- C:检测的类别数量
- T:检测总数
- M:最大检测数量
- D:检测大小(包括:边界框增量 xywh、置信度、关键点、每��类置信度)
- A:锚点数量
- H:金字塔中图像的高度
- W:金字塔中图像的宽度
- P:金字塔中图像的数量
retinanet_boxes 和 tflite_detection_input 格式的属性
| 属性 | 默认值 | 描述 |
|---|---|---|
| class_index_base | 0 | 对应输出向量第一个元素的类别索引 |
| transposed | 0 | 如果输出张量使用转置格式则必须为 1 |
| anchors | 锚点 | |
| x_scale | 10 | 参见 TFLite_Detection_PostProcess 层中的 x_scale 参数 |
| y_scale | 10 | 参见 TFLite_Detection_PostProcess 层中的 y_scale 参数 |
| h_scale | 5 | 参见 TFLite_Detection_PostProcess 层中的 h_scale 参数 |
| w_scale | 5 | 参见 TFLite_Detection_PostProcess 层中的 w_scale 参数 |
这种情况下,锚点可以使用内置变量 ${ANCHORS} 定义:
anchors=${ANCHORS}
该变量在转换时替换为 TFLite_Detection_PostProcess 层中 anchor 张量的内容(如果模型中存在)。
tflite_detection 格式的属性
| 属性 | 默认值 | 描述 |
|---|---|---|
| class_index_base | 0 | 对应输出向量第一个元素的类别索引 |
| h_scale | 0 | 检测框的垂直缩放(通常为输入张量的 H) |
| w_scale | 0 | 检测框的水平缩放(通常为输入张量的 W) |
yolov5 和 yolov8 格式的属性
| 属性 | 默认值 | 描述 |
|---|---|---|
| class_index_base | 0 | 对应输出向量第一个元素的类别索引 |
| transposed | 0 | 如果输出张量使用转置格式则必须为 1 |
| landmarks | 0 | 关键点数量 |
| anchors | 0 | 锚点。如果在模型中完成处理则不需要 |
| h_scale | 0 | 检测框的垂直缩放(通常为在模型中完成处理时输入张量的 H) |
| w_scale | 0 | 检测框的水平缩放(通常为在模型中完成处理时输入张量的 W) |
| bb_normalized | 0 | 如果边界框增量已归一化则必须为 1(仅适用于 yolov8),表示边界框归一化到 [0, 1] 范围而关键点在 h_scale、w_scale 范围内 |
对于 yolov5 格式,anchors 属性必须为从 P0 开始的每个金字塔元素包含一个条目,每个条目是 x,y 锚点增量的列表。例如对于 yolov5s-face,锚点在 yolov5s.yaml 中定义:
- [4,5,  8,10,  13,16]  # P3/8
- [23,29,  43,55,  73,105]  # P4/16
- [146,217,  231,300,  335,433]  # P5/32
元文件中对应的输出可定义如下:
outputs:
  - format: yolov5 landmarks=5 anchors=[[],[],[],[4,5,8,10,13,16],[23,29,43,55,73,105],[146,217,231,300,335,433]]
    dequantize: true
  - dequantize: true
  - dequantize: true
构建示例代码
示例应用程序(如 synap_cli、synap_cli_ic 等)的源代码包含在 SyNAP 版本中,与 SyNAP 库的源代码一起提供。基于 ASTRA 发行版的用户可以使用提供的 Yocto 配方构建 SyNAP。
对于其他用户,构建 SyNAP 代码需要安装以下组件:
- VSSDK 树
- cmake
构建步骤
cd synap/src
mkdir build
cd build
cmake -DVSSDK_DIR=/path/to/vssdk-directory -DCMAKE_INSTALL_PREFIX=install ..
make install
上述步骤将在 synap/src/build/install/bin 中创建示例应用程序的二进制文件。然后可以使用 adb 将二进制文件推送到开发板:
cd synap/src/build/install/bin
adb push synap_cli_ic /vendor/bin
用户可以自由修改提供的源代码以适应其特定需求。